DIY Video Studio is supported by its readers. Please assume links on this site are affiliate links, and that I get commissions for purchases made through these links. As an Amazon Associate, I earn from qualifying purchases. Thank you if you use any of the links.
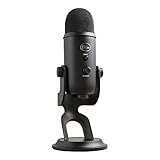
If you’ve bought a Blue Yeti condenser USB microphone it’s probably because you want to do game streaming, podcasting, voiceovers, YouTube vlogs, or even make conference calls. Fortunately, it’s quick and easy to set up your Blue Yeti condenser USB microphone. Before you start recording you should know how to position the Blue Yeti mic. This includes using a room that is noise and echo-free, positioning the Yeti in front of you, and at about 4 – 10-inches from your mouth. Ideally, your Blue Yeti should also be on a boom mic stand so it is not in direct contact with your desk.
There’s more to setting up your microphone, so I’ll go through the details of what you need to know and what you need to do. Once you’ve made the changes, you’ll be recording much better-quality audio with your Blue Yeti USB condenser microphone.
Sale


Unless you are planning to use a boom arm mic stand, or boom scissor mic stand you will want to fit the Blue Yeti to the included desktop stand.
The desktop microphone stand is all metal and heavy. It’s meant to be that way so that your Blue Yeti microphone has a good solid base to rest on and not wobble about.
The Yeti has two threaded mounting holes, one on each side of the microphone body. Linie these up with the matching holes in the “arms” of the desktop stand. Then insert and screw in each set screw while holding the mic with your other hand. If you find it awkward you may need someone to help.
Once the first screw is in, don’t tighten all the way. Move on to the set screw on the other side. When both set screws are in, tilt the Yeti to the required angle and then tighten off each of the set screws.
Use the included USB cable to connect the Yeti to your PC. The Yeti has a USB-mini socket on the base of the microphone body. Now connect the other end of the USB cable into a USB port on your PC. Since the Blue Yeti is a Plug’n’Play USB microphone your computer will automatically setup the microphone for you. However, your PC may already have other microphones installed, so you may need to select the Blue Yeti as your default audio recording and playback device.
You can select the Yeti as your default recording and playback device in several ways on Windows. I’ll show you just one way since it is similar in Windows 7.8.1 and 10. Although I assume most people will be using Windows 10.
Step 1. In the Windows search bar, next to the Windows icon, type “Control Panel”. Then click on the Control Panel app entry at the top of the pop-up menu.
Step 2. When the Control Panel opens click on Hardware and Sound.
Step 3. In Hardware and sound look to the right of the speaker icon and click on Manage audio devices or just click on the speaker icon.
Step 4. When the Sound window opens click on the Recording tab, scroll down, and click on Microphone: Yeti Stereo Microphone.
Step 5. Now click on the Playback tab, scroll down and click on Speakers: Yeti Stereo Microphone.
If you followed the previous steps, you Yeti will not only be your PC’s audio input but it’s also the audio output. You will have noticed in the last setup steps that Windows also sees the Yeti as speakers. This is because the Yeti is effectively a soundcard for your computer.
If you look at the bottom of the microphone, you’ll see not just the USB cable socket but also a 3.5mm headphone socket. Plug your headphones into the socket and you’ll not only hear the microphone output from the Yeti but also the sounds from your PC.
So, if you’re playing music, watching a video, or playing a game, you’ll hear the audio from those in your headphones along with the sound of your voice. That’s something I think is cool.
You’ve got the Yeti setup in its desktop stand and connected to your computer, so you’re ready to start recording. Unfortunately, you’re not.
Even if you had the most expensive studio microphone in the world if you use it in the wrong place your audio is going to sound like garbage. There’s more to recording good audio than just your recording equipment. You need to consider where to position your Blue Yeti, and that means thinking about the space in which you are recording.
There are two things that will influence your sound quality. 1: Background noise, and 2: Room echo or reverberation.
Background noise relates to how quiet your room is. That’s not just hearing noisy neighbors or your mom or kids from the kitchen. Also, consider sounds in your room. Can you turn off or move away from noisy fans and aircon? If you have a choice of rooms, one facing the street and one facing the backyard, go for the one that has less noise from outside.
Simple things like closing windows and doors can make a significant difference too. If you need excellent sound quality you might even consider installing soundproofing, although that can be an expensive step.
Room echoes, or reverberation, is something you’ll be more aware of in an empty room. I go into detail about room echo in my article, Why Does Sound Echo in an Empty Room . However, you’ll notice the problem more in an empty room and in rooms that have wood or laminate floors. I give a full account of what you can do about the problem in your home in my article, How to reduce echoes in a room cheaply .
Under normal conditions, you may not notice background sounds like neighbors, lawnmowers, birdsong, aircon, and computer fans. However, as soon as you put on headphones it’s remarkable how loud these sounds appear.
The thing is, our brains do a fantastic job of ignoring sounds that are unimportant. Under normal conditions, we filter those out and focus on the sounds that we’re interested in. Unfortunately, microphones aren’t quite the same. They don’t discriminate and will faithfully pick up the sound in the room. So, avoid rooms with noticeable reverberation if you’re recording a voiceover. However, reverberation may be just what you want if you’re recording a vocal or instrument.
If you record audio with reverberation, it can be difficult to remove. There are some post-processing techniques and plug-ins you can use to reduce reverb, but it can be tricky, and the results can be variable.
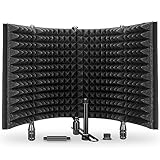
Whether you need to deal with light background noise or room reverberation you can improve your recordings a little by using a portable isolation shield.
The isolation shield is made of a perforated metal back, with the inner side filled with sound-absorbing cotton and/or high-density acoustic foam. The isolation shield goes around the back and sides of the microphone, reducing reflections and deadening background sounds.
I like the Aokeo microphone isolation shield since it is suitable for the Blue Yeti or any other similar condenser microphone. With the Yeti, the Aokeo isolation shield works whether you leave the Yeti on its desktop stand or hang the microphone from a Blue Compas boom arm stand and Radius III shock mount. It measures 12.1” x 10.8” x 5.5”.